This section describes how to install an application onto a node. To install an application requires:
the target machine name.
a supported Java environment installed on the target machine.
firewall configured to allow required network ports on target machine (see the section called “Required network ports”).
the TIBCO StreamBase® Runtime product installed on the target machine.
the application archive to install.
an optional node deploy configuration file.
access to the
epadmincommand line tool.
Node installation can be done remotely as long as the TIBCO StreamBase® Runtime product is installed on the machine and SSH access is available (see the section called “Secure shell (SSH)”).
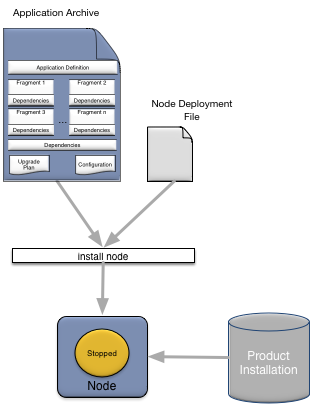
A node is installed to host an application using the
epadmin install node command. In general only these
parameters (see the section called “node target” for a complete
install node parameter reference) need to be specified
when installing a node:
application- the application archive.javahome- optional path to the Java environment if not located at theJAVA_HOMEenvironment variable or a built-in platform default.nodedeploy- an optional node deploy configuration file.nodedirectory- an optional directory in which the node should be installed.nodename- the fully qualified service name for the node.
If a node deploy configuration file is specified using the
nodedeploy parameter it must contain a definition for
the node being installed. For example, if a node named
A.X is being installed, the node deploy configuration
file must contain a nodes entry for
A.X:
name = "my.application"
version = "1.0.0"
type = "com.tibco.ep.dtm.configuration.node"
configuration =
{
    NodeDeploy =
    {
        nodes =
        {
            "A.X" = { ... }
        }
    }
}
Here is an example of installing an application on a node:
epadmin install node --nodename=A.X --nodedirectory=/opt/tibco/deploy/nodes --application=payments.zip --nodedeploy=payments.conf
After a node has been installed, the node directory has been created and management processes have been started. The node must now be started to start the application. See the section called “Starting” for details on starting a node.
As part of node installation, default application and node configuration information is installed. Both the application and node configuration information can be overridden by specifying a node deploy configuration file when installing a node. The default configuration can also be augmented using the node deploy configuration file. Node deployment configuration files are described in detail in Chapter 3, Node Deploy Configuration.
When an application is initialized there is a well defined order in which configuration is processed:
Default configuration built in to the product.
Application definition configuration in the application archive.
Node deploy configuration in the application archive.
Node deploy configuration specified on the
install
          node
command line.Configuration from fragments contained in the application archive, loaded in reverse classpath order. See the section called “Fragment configuration load order” for more details.
Configuration from the application archive.
Configuration from the global configuration section (see the section called “NodeDeploy”) in the node deploy configuration file.
Configuration from the node configuration section (see the section called “Node”) in the node deploy configuration file.
Configuration from the engine binding configuration section (see the section called “EngineBinding”) in the node deploy configuration file.
Configuration specified in the node deploy global or per-node configuration sections is processed in the order in which it is specified in the file - the first configuration is processed first, the second next, and so on.
This implies that configuration loaded after other configuration can override previously loaded and activated configuration (see the Configuration chapter in the Architects Guide for details on configuration replacement). A failure to load or activate a configuration file will cause the node startup to fail. See the section called “Starting” for more details.
When an application is installed, fragment configuration
is loaded using the classpath of the top-level fragment
(Fragment-A and Fragment-B in
Figure 2.2, “Application dependencies”) engines. For each engine,
fragment configuration is loaded in reverse classpath order. If there
are duplicate dependencies in the classpath, the configuration for the
duplicate dependency is loaded only once when the dependency is first
processed during start-up. If an application archive itself has
multiple classpath elements containing configuration, this
configuration is also loaded in reverse classpath order. Finally, if
there are multiple configuration files in a single classpath element,
they are loaded in ASCII sort order.
Configuration load ordering between engines is undefined.

Using the application dependencies in Figure 2.2, “Application dependencies”, configuration would be loaded in this
order (assuming Fragment-A engine is loaded before
Fragment-B engine - this is undefined
behavior).
Fragment-A engine
c.conf
a.conf
Fragment-B engine
d.conf
e.conf
(c.conf skipped, already loaded as part of Fragment-A engine processing)
b.conf
Application
x.conf
A subset of the install node parameters can also be set in configuration as shown in Table 2.1, “Install node parameter mapping to configuration properties”. If a value is set both in configuration and on the command line, the command line value takes precedence.
![[Note]](images/note.png) | |
It is recommended that configuration be used instead of command line parameters to ensure consistency of application deployment on multiple machines. |
Table 2.1. Install node parameter mapping to configuration properties
| Install Parameter | Configuration Property |
adminhost | Administration.address (see the section called “Administration”) |
adminport | Administration.transportPort (see
the section called “Administration”) |
application | None |
buildtype | Execution.buildType (see Application Definition Configuration
chapter in the Transactional Memory
Developers Guide) |
deploydirectories | None |
discoveryhosts | Communication.discoveryRequestAddresses
(see the section called “Communication”) |
discoveryport | |
javabinarypath | None |
javaenvironment | None |
javahome | None |
javalibrarypath | None |
memoryallocators | SharedMemory.memoryAllocators (see
Application Definition
Configuration chapter in the Transactional Memory Developers
Guide) |
memorysize | SharedMemory/memorySizeBytes (see
Application Definition
Configuration chapter in the Transactional Memory Developers
Guide) |
memorytype | SharedMemory.memoryType (see
Application Definition
Configuration chapter in the Transactional Memory Developers
Guide) |
nodedeploy | None |
nodedirectory | None |
nodename | None |
producthome | None |
substitutions | None |
substitutionfile | None |
webenabled | Administration.webEnable (see the section called “Administration”) |
webport | Administration.webPort (see the section called “Administration”) |
When all dependencies are not packaged into an application archive, they must be made available to each node running the application using either engine configuration or deploy directories.
The JavaEngine.externalClassPath and
JavaEngine.externalNativeLibraryPath configuration
values can be used to define locations on the local machine running a
node where Java and native library dependencies can be located. See
the section called “JavaEngine” for more details on these
configuration values.
Deploy directories provide a mechanism for adding JAR, class files, or native libraries that are not packaged in an application archive to an engine's class path or shared library path without having to define any configuration.
Deploy directories, and all JAR files contained in a deploy directory, are added to an engine's class path. The deploy directory is also added to the engine's shared library path.
Nested directories in a deploy directory are not added to the class path or shared library path, or searched for JAR files. The exception is if a JAR file is in an engine deploy directory (see the section called “Engine deploy directories”).
![[Warning]](images/warning.png) | |
There is no support for native libraries in engine deploy directories. |
Node deploy directories are optionally specified
during node installation and upgrade. See the section called “node target” for details on setting node deploy
directories from the epadmin command line.
Node deploy directories apply to all engines running on a node.
Engine deploy directories apply to the engine whose name matches a directory name. See Chapter 3, Node Deploy Configuration for details on how to set an engine name in the node deploy configuration.
Engine deploy directories are optional and they are not automatically created; they must be manually created.
Engine deploy directories are located within existing node deploy directories.
Figure 2.3, “Deploy directories” shows an example
where the node deploy directories were set to
/a/jars and /b/jars at node
installation time, and two engine deploy directories named
EngineOne and EngineTwo were
created under them with the JAR files installed as shown in Figure 2.3, “Deploy directories”.
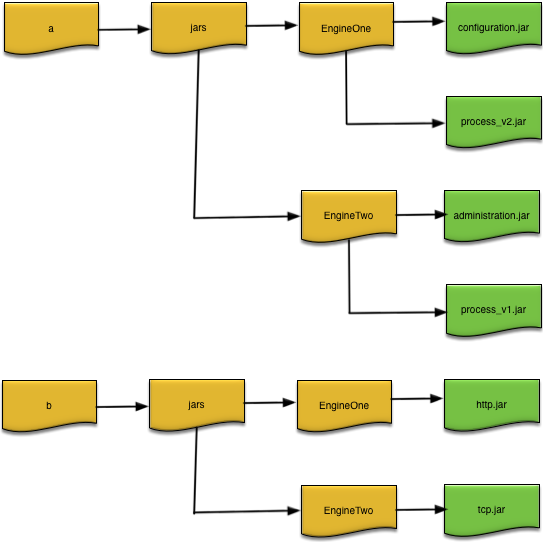
When EngineOne and
EngineTwo are started they will be have these JAR
files and directories added to their class paths:
EngineOne-/a/jars/EngineOne/configuration.jar:/a/jars/EngineOne/process_v2.jar:/a/jars/EngineOne:/a/jars:/b/jars/EngineOne/http.jar:/b/jar/EngineOne:/b/jarsEngineTwo-/a/jars/EngineTwo/administration.jar:/a/jars/EngineTwo/process_v1.jar:/a/jars/EngineTwo:/a/jars:/b/jars/EngineTwo/tcp.jar:/b/jars/EngineTwo:/b/jars
When an engine is started, all configured node deploy directories are searched in the order specified at node installation or upgrade for sub-directories with the same name as the engine being started. If a matching sub-directory is found, all JAR files found within are sorted by name, in ascending ASCII order, and added to the engine's class path, and then the sub-directory is added to the class path.
Next any JAR files found in node deploy directories are automatically added to the engine's class path and the node deploy directory itself is added to the class path. The top level of the deploy directories are scanned in the order specified at node installation or upgrade time, and within each deploy directory the JAR files are sorted by name, in ascending ASCII order, and added to the engine's class path.
A node inherits all environment variables set in the environment in which the node was installed. This provides a mechanism to make environment variables available to deployed applications. The inherited environment is printed in the node coordinator's log file. Any changes to environmental variables after a node is installed do not affect the node's inherited environment.
There is special handling of the executable search path, e.g.
PATH, and the shared library search path, e.g.
DYLD_LIBRARY_PATH. Both the executable and library
search paths inherited from the environment are appended to the paths
defined by the node. This ensures that a setting in the inherited
environment cannot cause incompatibilities with a node's required
environment.
When a node is installed, the following security related policies are automatically defined:
a default local authentication realm named
default-realmis created.a user is created in that realm for the operating system user.
an optional user is created in that realm if a user name is specified when installing the node.
the local machine is defined as a trusted host.
The default local authentication realm has these security policies defined:
require password is false.
require trusted host membership is false.
allow secure communication client authentication is false.
A user is defined in the default local authentication
realm when a node is installed using the user name determined from the
operating system context in which the node installation was done. This
is the name of the user logged into the operating system when performing
a node installation. By default this user has a random password assigned
and they are granted administrator role privileges,
which give that user full administrative access to the node. This user
can only access the node from a trusted host since the password is
unknown. The password should be changed to a known value (see the section called “Change a password”) to allow this user to access the
node from a non-trusted host.
A known password can also be set for the operating system user on
the command line using the password parameter to
install node. For example,
//
//    The operating system user will have a password of admin
//    instead of a random password
//
epadmin --password=admin install node --nodename=A.X
A user definition is also automatically defined in the
local authentication realm for the optional username
and password parameters specified when installing a
node. This user definition uses the value of the
username parameter as the principal name and the
value of the password parameter as the text
credential. This principal definition is granted
administrator role privileges. For example, this
command will define a user named guest with a
password of guest for the node being
installed.
epadmin --username=guest --password=guest install node --nodename=A.X
The operating system user name, and the user name specified when installing a node, may be the same or different. Both users are granted the same privileges and access to the node. The only difference is that the operating system user can perform administrative commands on the local node without specifying a user name or password because of the default trusted host configuration described next.
The default trusted host configuration defines
localhost, and the actual host name where the node is
being installed, as trusted hosts. This allows the operating system user
to administer the node without specifying a username or password when
executing administrative commands from the same machine on which the
node was installed. This is accomplished by epadmin
using the operating system identity when executing administrative
commands if no user name and password is specified. Since the operating
system user was defined as a principal with administrative privileges on
the node during installation, they are allowed to execute any
administrative command.
See Chapter 5, Security for additional details on the security architecture and configuration.