This section discusses node management, other that installation
which was described in the section called “Application installation”.
Node management can be done using Administrator, JMX consoles, or
epadmin.
Once a node has been installed, it must be started.
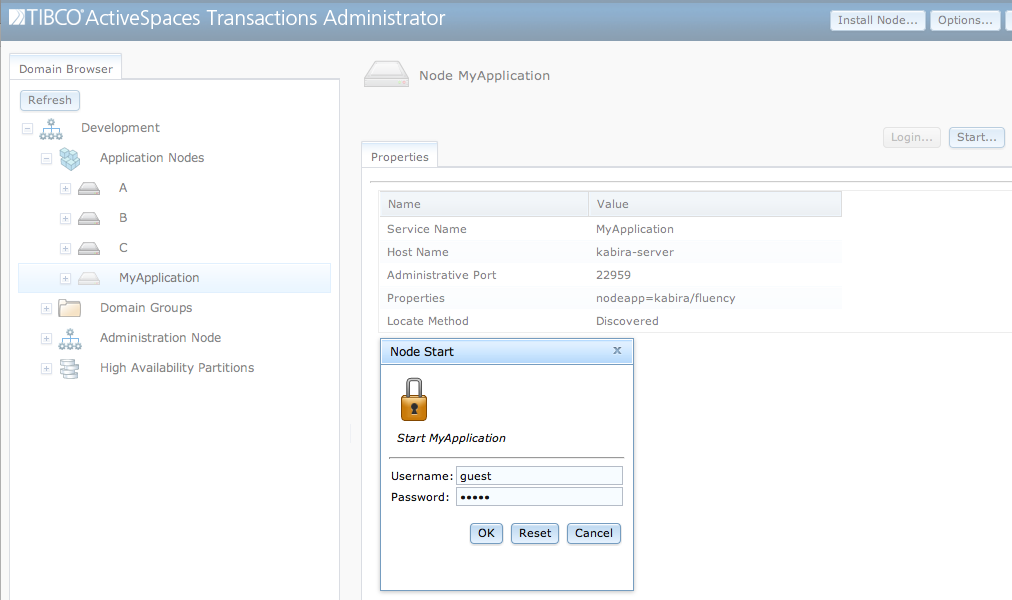
To complete the installation the node must be started. This is
done by selecting the node and clicking on the
Start... button as shown in Figure 2.4, “Starting node”.
When a node is started the following occurs:
all application fragment engines are started.
configuration files are loaded.
configuration files are activated.
the node joins the cluster.
Any failures detected while loading and activating configuration causes any previously processed configuration files to be deactivated and removed, and node start-up fails.
The following steps are required to start a node from Administrator
Log into the node
Start the node
This command can also be used to start a node:
epadmin --servicename=A.X start node
Optionally this command can be used to start all nodes in cluster
X:
epadmin --servicename=X start node
When a node is stopped the following occurs:
configuration files that were activated when the was node started are deactivated.
configuration files that were loaded when the node was started are unloaded (removed).
all application fragment engines are stopped.
the node leaves the cluster.
Any configuration that was loaded and activated after a node was started are not deactivated and removed when the node is stopped.
Any failures detected while deactivating and removing configuration are logged, but stopping the node continues.
The following steps are required to stop a node from Administrator
Log into the node
Stop the node
This command can also be used to stop a node:
epadmin --servicename=A.X stop node
Optionally this command can be used to stop all nodes in cluster
X:
epadmin --servicename=X stop node
A stopped node can be restarted to resume application execution.
A node must be stopped before it can be removed. When a node is removed the following occurs:
all application container services are stopped.
administration services are stopped.
all application fragment engines are removed.
the node directory is removed.
![[Warning]](images/warning.png) | |
Removing a node discards all data stored in the node. Any precious data must be replicated or externalized before removing the node or it will be lost. |
The following steps are required to remove a node from Administrator
Log into the node
Remove the node
This command can also be used to remove a node:
epadmin --servicename=A.X remove node
Optionally this command can be used to remove all nodes in cluster
X:
epadmin --servicename=X remove node
| |
To reclaim System V shared memory a node must be removed using the procedure described in this section. System V shared memory is not released by removing a node directory manually. |
A node must be reinstalled after it has been removed.
When a machine on which a node is running is shutdown, the node must be quiesced before shutting down the machine.
| |
Failure to quiesce a node when a machine is shutdown will require the node to be removed and reinstalled losing all data stored in shared memory. |
When a node is quiesced the following occurs:
application container services are stopped.
administration services are stopped.
These commands are used to quiesce a node:
epadmin --servicename=A.X stop node
epadmin --servicename=A.X terminate node
When the machine is rebooted this command must be used to restart the node:
epadmin start node --installpath=<node-directory>/<node-name>
Please see the section called “Operating system service management” for details on integration with operating system specific service management subsystems to perform these actions automatically.
Applications running on a node can be upgraded without impacting other nodes in the cluster. When a node is upgraded with a new application version, the following steps are taken:
Audit that all classes being upgraded are in a partition with at least one replica node. This ensures that the objects can be migrated to another node during the upgrade process to avoid any data loss and to provide continuous service availability. This audit can be disabled by setting the Remove Non-Partitioned Objects option to True.
Setting the Remove Non-Partitioned Objects option to True can cause data loss, because non-replicated objects will be removed during the upgrade process. Use this option with extreme caution.
Leave the cluster. This causes all active partitions to migrate to their replica nodes.
Stop the node.
Update deployment directories for the node if new ones were provided in the upgrade or restore node dialog.
Remove all objects that are being upgraded. Replicated objects are still available on the nodes where the partitions migrated.
Restart the node.
Add the node as a replica to all partitions that were migrated off the node.
Join the cluster.
When the upgrade process completes, the new application version has been installed on the node, and the node is active in the cluster as a replica. The final step required to bring the node back online is to migrate partitions that should be active on this node back to the node.
Upgrading a node is initiated by clicking on the Upgrade
or Restore... button on the node screen in Administrator as shown in Figure 2.5, “Upgrade or restore node dialog”.
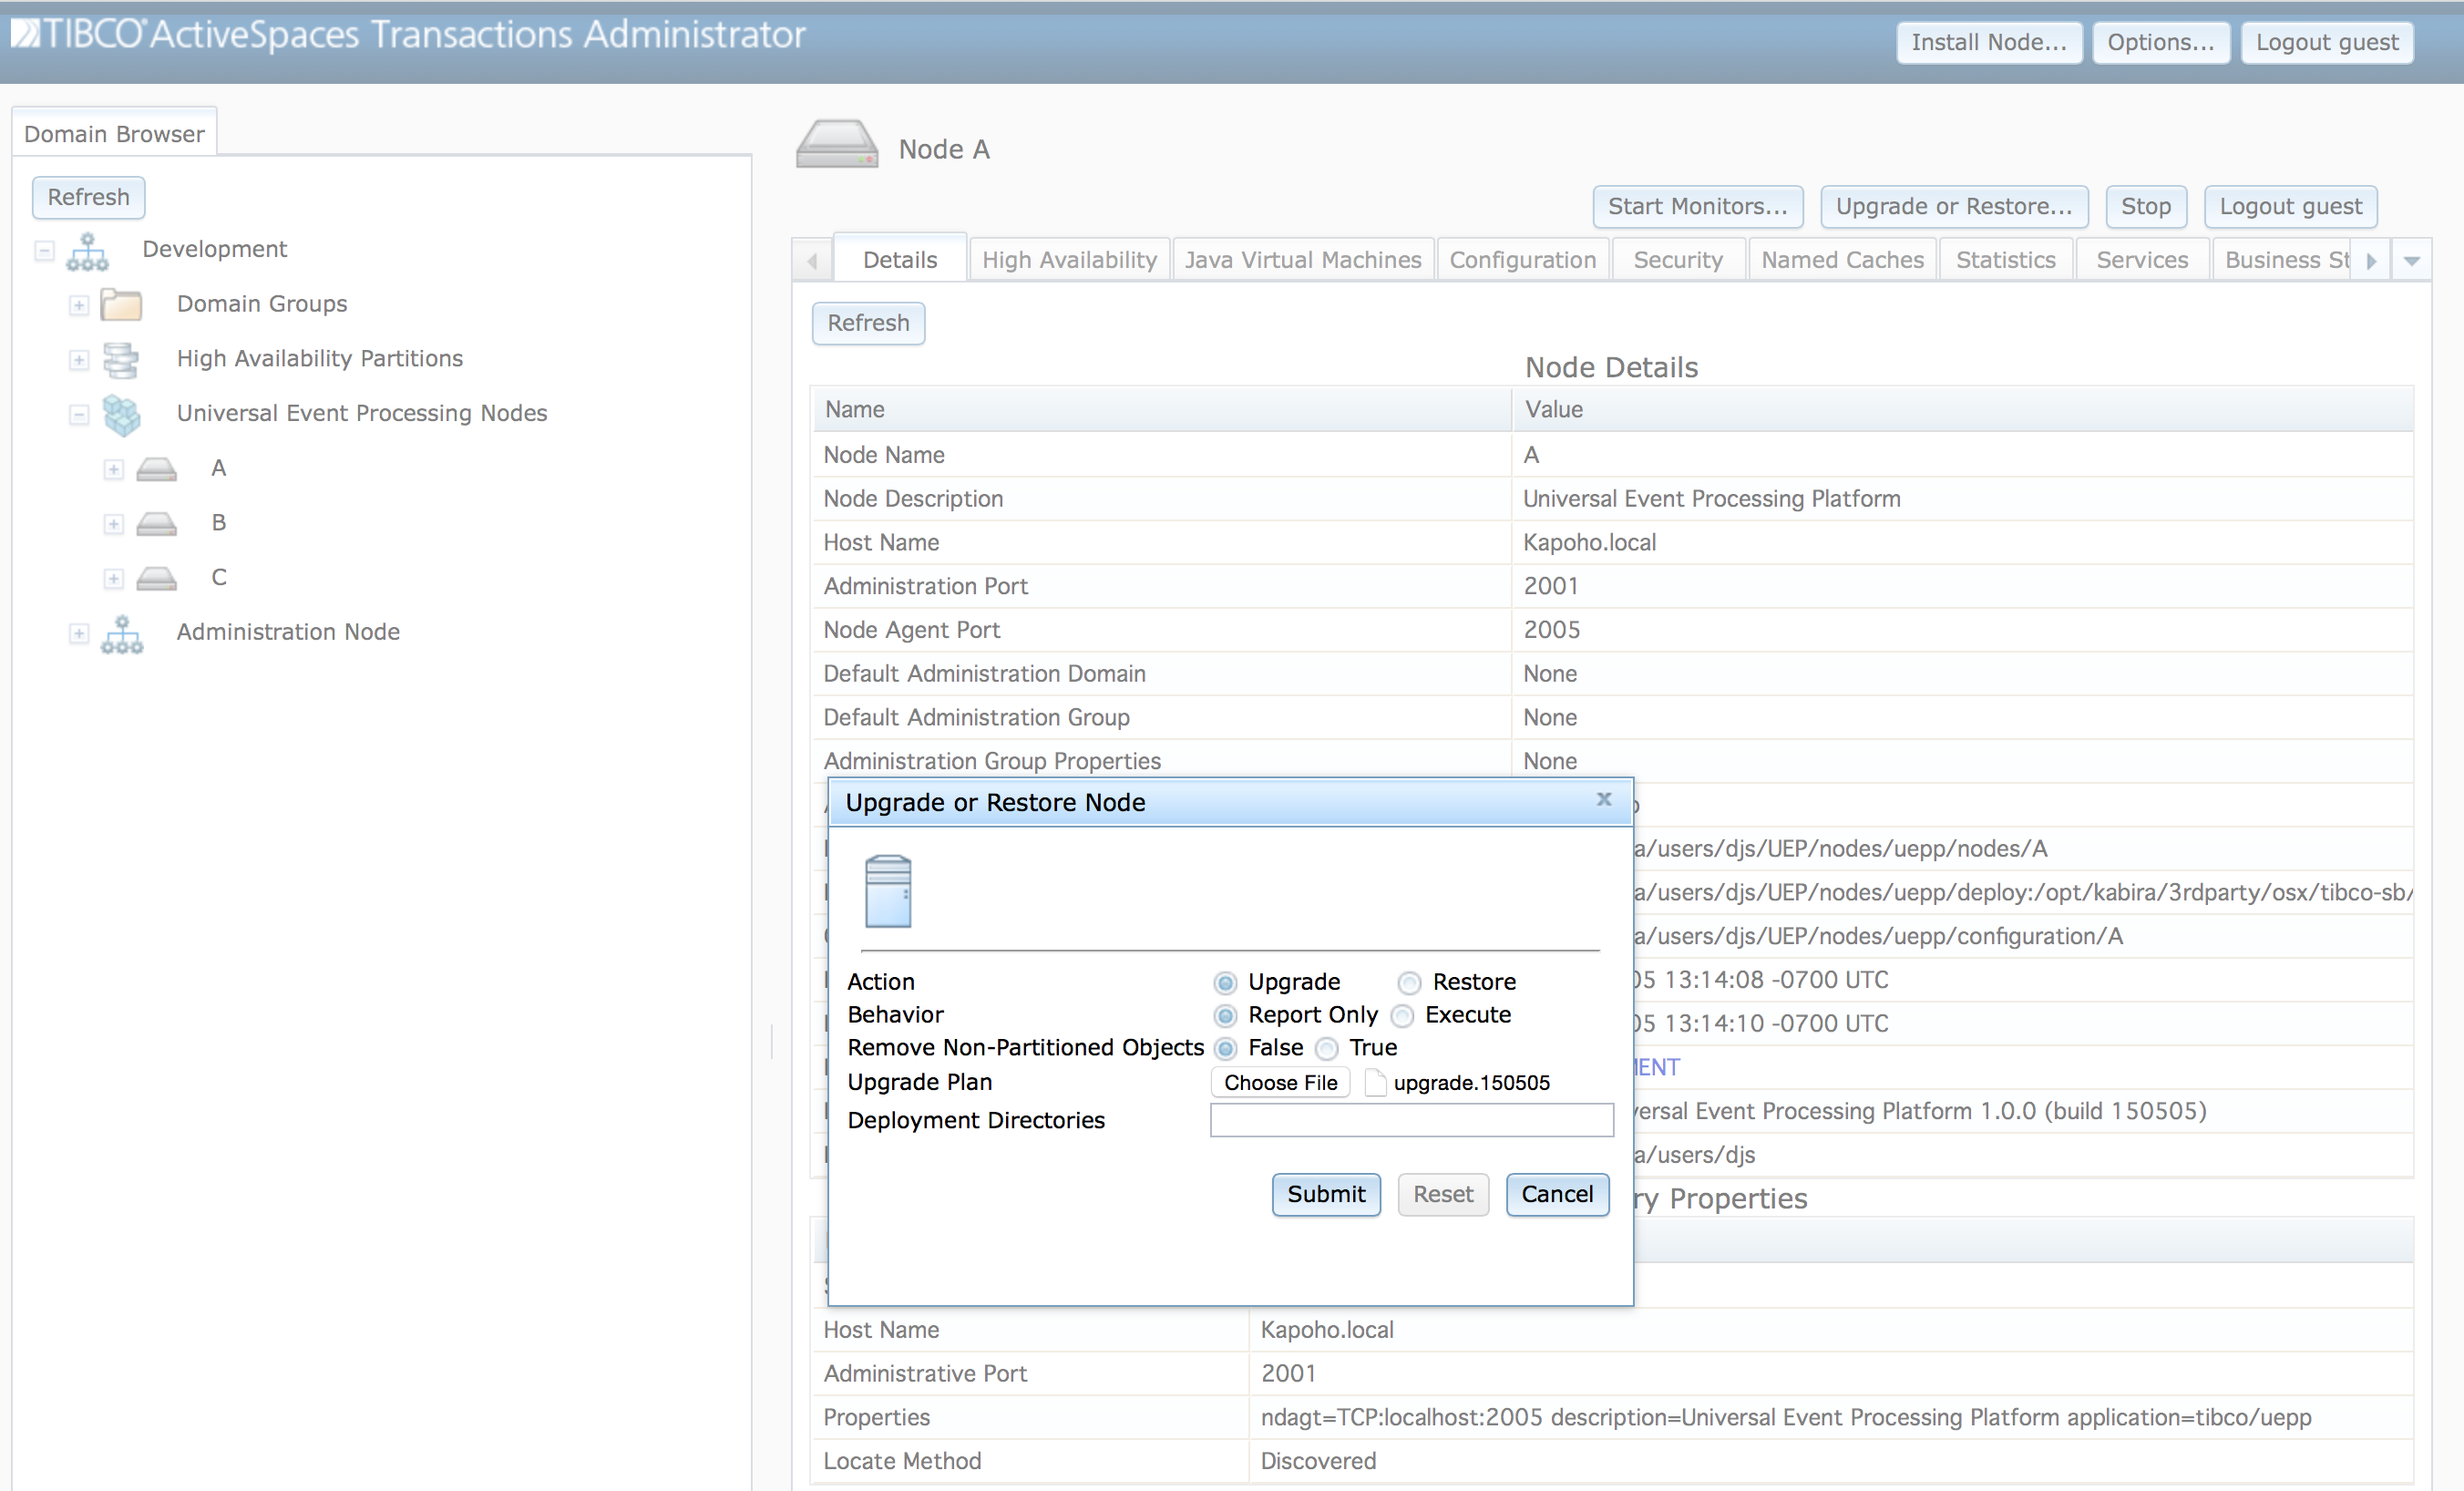
The Table 2.2, “Upgrade or restore options” table defines the values in the upgrade or restore dialog.
Table 2.2. Upgrade or restore options
Before performing the upgrade, the updated application JAR files
must be installed into the node deploy directories. It is recommended
that different deployment directories be used for each version of an
application being upgraded. This makes it easy to restore the node to a
previous application version by resetting the deployment directories to
their previous value. Deployment directories are changed using the
Deployment Directories field in the upgrade or
restore dialog.
To perform the upgrade, select the Upgrade
action in the dialog and set the behavior to Execute
and then click on the Submit button.
![[Note]](images/note.png) | |
It is recommended that the |
An upgrade can also be performed using this command:
epadmin --servicename=A.X upgrade node --upgradefile=upgrade.150505
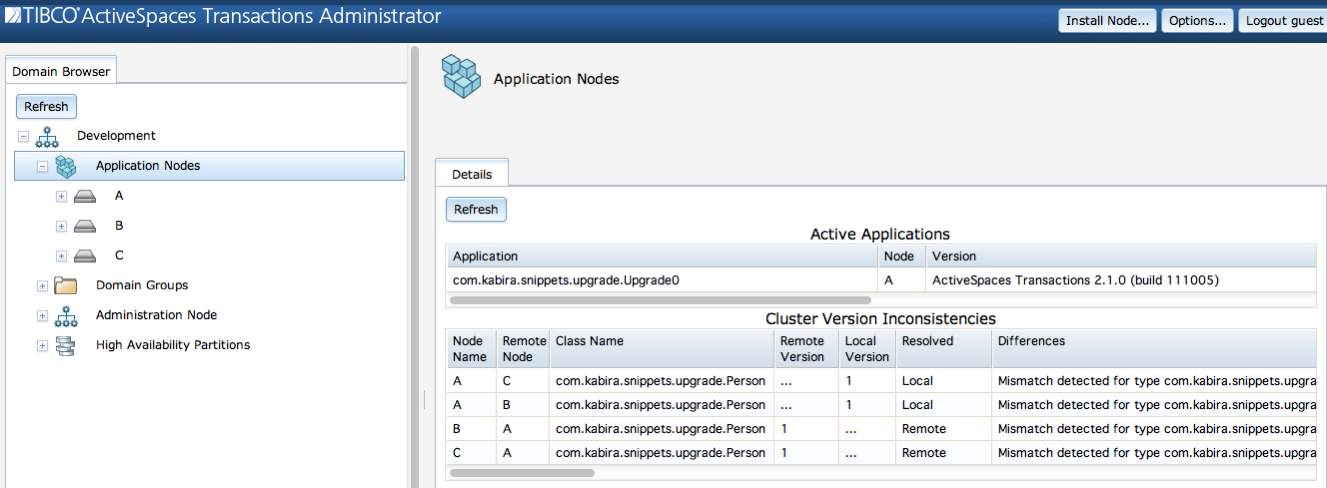
Current application versions on all nodes in a cluster can be displayed on the Application Nodes screen as shown in Figure 2.6, “Cluster version display”, or using these commands:
//
// Current active applications running on cluster X
//
epadmin --servicename=X display application

//
//  Display version inconsistencies
//
epadmin --servicename=X display cluster --type=classmismatches
This information is displayed for the each application fragment running in a cluster:
Fragment Name - application fragment type.
Fragment Engine Type - type of engine executing fragment.
Application Name - application name.
Application Version - application version.
Application Description - application description.
Application Install Time - time application was installed.
Application Start Time - last time application was started.
This information is displayed for any application version inconsistencies in the cluster:
Node Name - Node reporting inconsistency.
Remote Node - Node to which inconsistency exists.
Class Name - Name of class that is inconsistent.
Remote Version - Remote class version.
Local Version - Local class version.
Resolved - Which node is resolving the inconsistency.
Differences - Description of differences.
Restoring a node to a previous application version is done using the upgrade or restore node dialog in Figure 2.5, “Upgrade or restore node dialog” described in the section called “Upgrading”, or this command:
epadmin --servicename=A.X upgrade node --restorefile=upgrade.150505
Node restoration is useful to back-out a new application version that is causing errors. When a node is restored to a previous application version, the following steps are taken:
Audit that all classes being restored are in a partition with at least one replica node. This ensures that the objects can be migrated to another node during the restore process to avoid any data loss and to provide continuous service availability. This audit can be disabled by setting the Remove Non-Partitioned Objects option to True.
Setting the Remove Non-Partitioned Objects option to True can cause data loss, because non-replicated objects will be removed during the restore process. Use this option with extreme caution.
Leave the cluster. This causes all active partitions to migrate to their replica nodes.
Stop the node.
Update the deployment directories for the node if new ones were provided in the upgrade or restore node dialog.
Remove all objects that are being restored. Replicated objects are still available on the nodes where the partitions migrated.
Restart the node.
Add the node as a replica to all partitions that were migrated off the node.
Join the cluster.
When the restore process completes, the previous application version has been re-installed on the node, and the node is active in the cluster as a replica. The final step required to bring the node back online is to migrate the partitions that should be active on this node back to the node.
Before performing the restore, the previous version of the
application JAR files must be re-installed into the deployment
directories for the node. If different deployment directories were
specified when the application was upgraded, the previous ones should be
used, and specified in the Deployment Directories
field of the upgrade or restore node dialog. The Mismatch
File specified in the upgrade or restore node dialog must be
the same one that was used to upgrade to the new application
version.